

Crafting Space for Intarsia: How to Design the Optimal Workshop
- Intarsia Wood Art
- 6 days ago
- 9 min read
Updated: 1 hour ago
For woodworkers, the workshop is a kingdom where all tools live in perfect harmony. It’s a special place where friends and family gather to see where those wonderful wood sculptures are made. When they walk in, they immediately notice the smell of fresh-cut wood, and they are amazed at how clean it is (an illusion, of course). For most, the workshop can be a great source of pride even though it’s also in perpetual renewal with new tools and equipment.
Workshops come in all shapes and sizes, and for many of us, it’s a space where we spend most of our day (away from reality), so they need to be effective and comfortable. But how do you do that, especially if your space isn’t very big? Speaking from experience, that doesn’t need to be a problem. In this blog, we’ll be looking at ways you can design an efficient, clean, and space-friendly workshop. We’ll also be looking at my own setup for inspiration, of course, not for bragging or anything!
Designing Your Intarsia Woodworking Workshop
Designing your own workshop takes time and patience, and it may take several years to accomplish. As mentioned, workshops are in a constant state of flux as you acquire more tools and improve your craft. Here are some important elements to consider when designing your workshop:
Space
My workshop is in a single 10’ by 24’ car garage, which is a relatively small area. Whatever size you’re working with, ensure that you allocate enough space to work on a variety of Intarsia projects. Allow ample room for workbenches, storage for materials and tools, and maneuverability around equipment. A spacious workshop allows for greater freedom of movement and reduces the risk of accidents.
Design the workshop to accommodate a range of Intarsia projects and woodworking techniques. Allow for modular or adjustable workstations that can be reconfigured as needed to accommodate different project sizes and requirements.
Lighting
Adequate lighting is essential for detailed Intarsia woodworking tasks. Natural light is ideal, so if possible, position the workshop in a location with large windows or skylights. Supplement natural light with overhead LEDs or fluorescent lighting to ensure consistent brightness throughout the workspace.
Ventilation
Woodworking generates dust and fumes that can be hazardous to your health if not properly ventilated. Install a ventilation system, such as exhaust fans or air purifiers, to remove airborne particles and maintain air quality. Additionally, consider wearing personal protective equipment, such as respirators or dust masks, when working with wood.
Workbenches and Surfaces
Equip your workshop with sturdy workbenches or tables where Intarsia projects can be assembled and worked on. Ensure the surfaces are flat, level, and stable to provide a reliable foundation for intricate woodworking tasks.
Tool Organization
Organize tools and equipment in a logical and accessible manner to streamline workflow and minimize clutter. Install wall-mounted racks, shelves, or pegboards to store hand tools, power tools, and supplies within easy reach.
Safety Measures
Prioritize safety in the workshop by implementing appropriate safety measures and equipment. Make sure to follow the instructions on the safe use of tools and ensure all visitors adhere to safety guidelines. Keep emergency equipment, such as fire extinguishers and first aid kits, readily available in the workshop.
Inspiration and Creativity
Incorporate elements that inspire creativity and foster a positive working atmosphere in the workshop. For instance, background music can make workspaces more enjoyable, which might encourage longer and more productive work sessions.
By incorporating these elements into the design of your Intarsia workshop, you can create a functional, safe, and inspiring environment that supports the creative process and facilitates skill development.
My Workshop
Let’s look at some key components of my own workshop. In doing so, I will explain some of the choices I’ve made and, who knows, it may just inspire you and give you some ideas for your own workshop.
Not only for Intarsia
First off, like most woodworkers, I don’t just do Intarsia. I also do a lot of scrolling work and recently added a laser to my collection of tools. It is also a place where I tune the lawnmower, fix furniture, store my paint, build wooden puzzles and games such as cribbage boards, and so much more. Suffice it to say that it must remain flexible enough to do more than purely Intarsia.

The picture to the left gives you an idea of the size. It used to be a 10 x 24’ single-car garage. In the summer, the garage door is always open and provides much-needed natural light and air circulation.
You will notice the large red tool chest to the left, where I store some of my tools but also all my paper patterns. The large and deep drawers allow me to lay them flat and free up the space that used to be taken by the dreaded cardboard tubes.
You will also notice the indispensable fridge where I store refreshments—and much more.
Now, let’s talk about wood storage.
Wood Hoarder
A common trait among intarsia artists is our love for wood—there's never enough in the workshop! I started with boards leaning against the wall, then moved to a flat lumber storage rack, which was an improvement but made it hard to see all the different boards without rearranging them.
The setup shown here is my current solution:

Since intarsia rarely requires long boards, I find that cutting them to 18 inches meets 90% of my needs.
By mounting tabletops on my lumber storage brackets, I can store all boards facing outward, each cut to 18 inches.
I label each column of boards, providing easy, instant access. If you zoom in, you'll see the various wood species.
I keep some longer boards just in case, and the garbage can to the right of the tool chest holds scraps too small to save. More on storing cutouts later.
The bandsaw is primarily for ripping thick boards, but it's also a versatile tool for many applications. I've arranged my wood storage and tool chests so they don’t obstruct the bandsaw when cutting long boards—something important to consider when positioning your tools.
The All-Mighty Scroll Saw
I've used a 21" Pegas scroll saw for a couple of years now. It replaced my 10-year-old Excalibur, which itself had followed a Dewalt 788. I prefer the Pegas for its easy blade changes and sturdy construction, with its blade holder being a true game-changer—I rarely experience blade slips now, which was common with the Dewalt. However, the Pegas motor did need a warranty replacement after the first year. You just can’t win them all!
Key elements of my scroll saw setup:
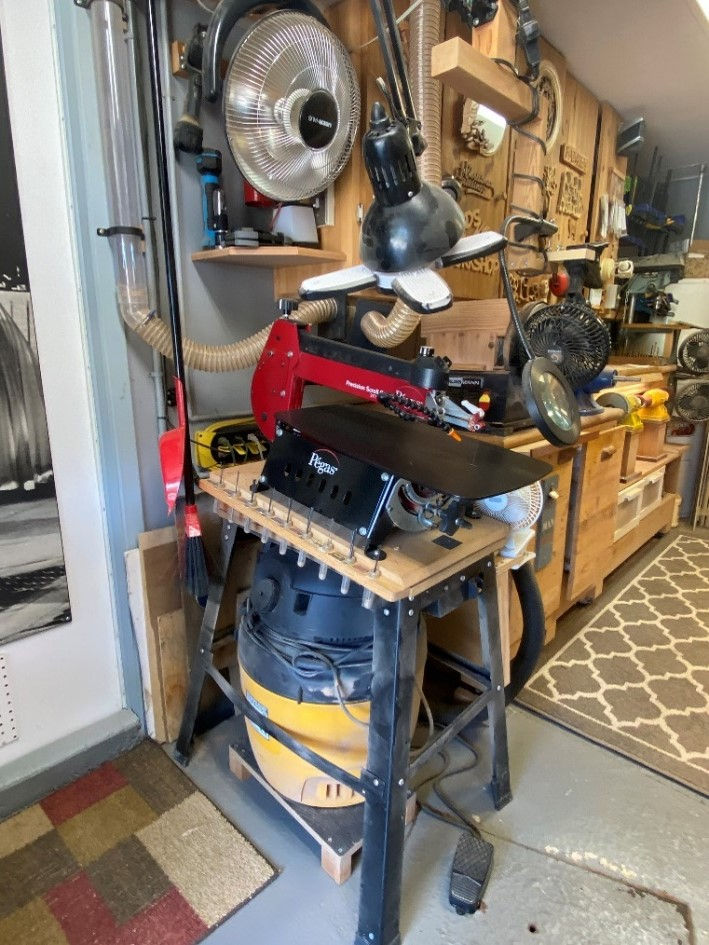
As with my bandsaw, I keep the area around the scroll saw obstacle-free, making it easier to maneuver wood.
I use a pedal to activate the saw, ensuring my hands stay on the piece while cutting.
I use two fans: one beneath the table and one suspended from the ceiling to keep dust clear from the table surface.
A bright LED light, also ceiling-mounted, minimizes vibrations and provides excellent visibility. Don’t hesitate to invest in good lighting—it makes a huge difference!
The magnifying glass is indispensable for precise scrolling work and is ceiling-mounted to reduce vibrations.
A radiant heater is essential for Quebec winters. This type uses a coil to radiate heat directly to objects, and I can swivel it as needed.
The Mighty Shop-Vac
When you’re dealing with a small workshop, you must compromise on certain things (actually, many things). In my case, I could not install a large dust collection system, so I rely on a Shop-Vac to provide minimal dust collection at key stations within the workshop. You will notice the flexible piping that runs from the cyclone unit in the cabinet and is connected to the bandsaw, the belt sander, and the miter saw. I also have a Wen air filtration system attached to the ceiling, which is particularly important in the winter when the garage door is closed.
Overall, I would rate my dust collection setup as barely adequate. I would recommend that you make it a priority to install a proper dust collection system if you have the space to do it. I get by with my setup, but it is certainly not ideal.
Comfortable Floor
I have always used a padded floor in the workshop. I use a layer of interlocking foam floor tiles covered with a carpet. This setup is designed to reduce fatigue caused by standing for long periods on a hard surface (e.g., cement floors). Trust me—it works!
Tempered Glass to the Rescue
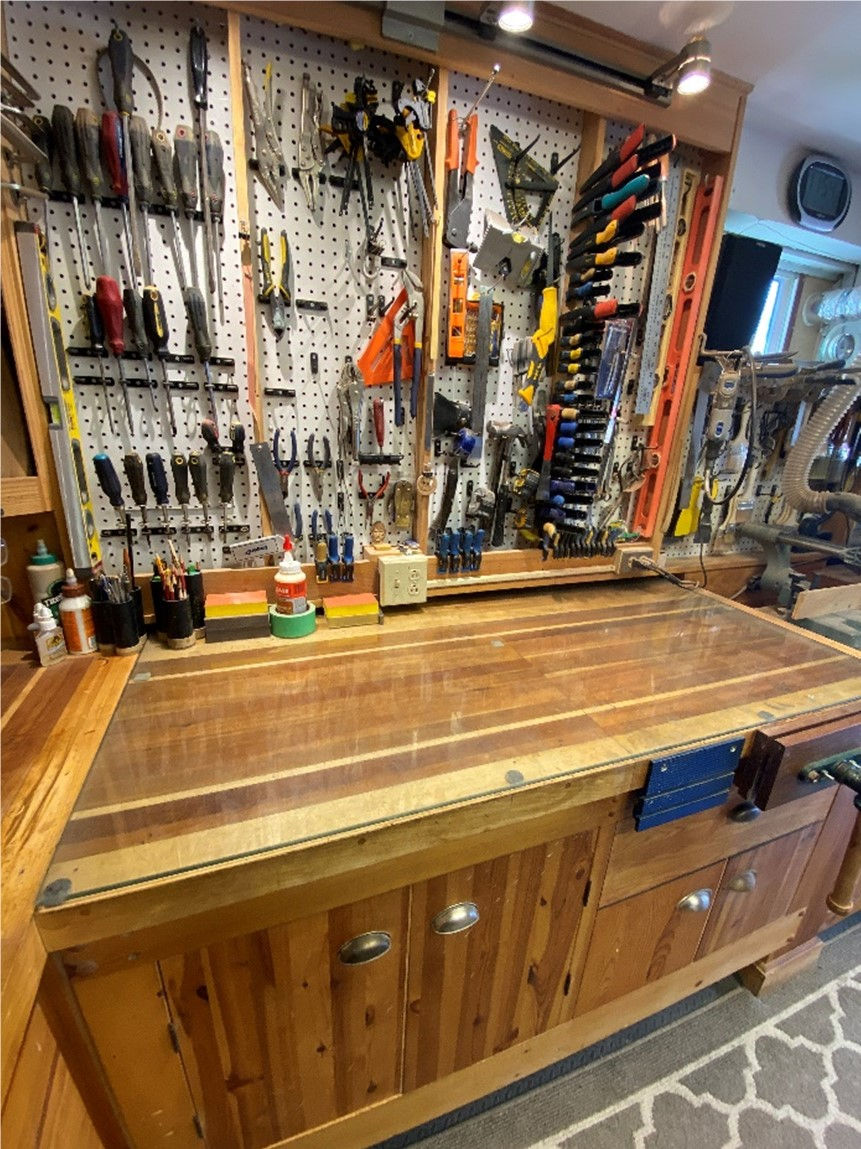
Intarsia requires a smooth and uniform surface to work. The flatter, the better, as bumps and irregular surfaces can really hamper the fitting and assembly of Intarsia pieces. Over the years, I have used several different materials, but nothing beats tempered glass. I use a 3/8" piece of glass that covers my entire main workbench.
Tempered glass is perfectly flat, easy to clean, and resistant to most chemical products. The only drawback is you must avoid dropping heavy objects on it (such as a hammer), as it may break—but this stuff is very tough.
Bench Vise
Notice the large bench vise attached to the main workbench. This is another essential item where you want to invest wisely. I use it all the time, and it is easily accessible due to its location as part of the main workbench.
Sanding Station
You can refer to my blog on Shaping to learn all about my sanding station.
Hidden Treasures

Tucked underneath my belt sander and the polishing machine is my cyclone vacuum unit and the garbage can. Those items were just impossible to position in my small workshop, so they remain hidden in a sturdy cabinet unit.
Another item that is well hidden is the mighty compressor. This essential component of any workshop is tucked away underneath the workbench that holds the laser machine. The door allows for easy access for maintenance. When closed, the door also provides good sound insulation for this most noisy component.
Did I Mention Clamps?
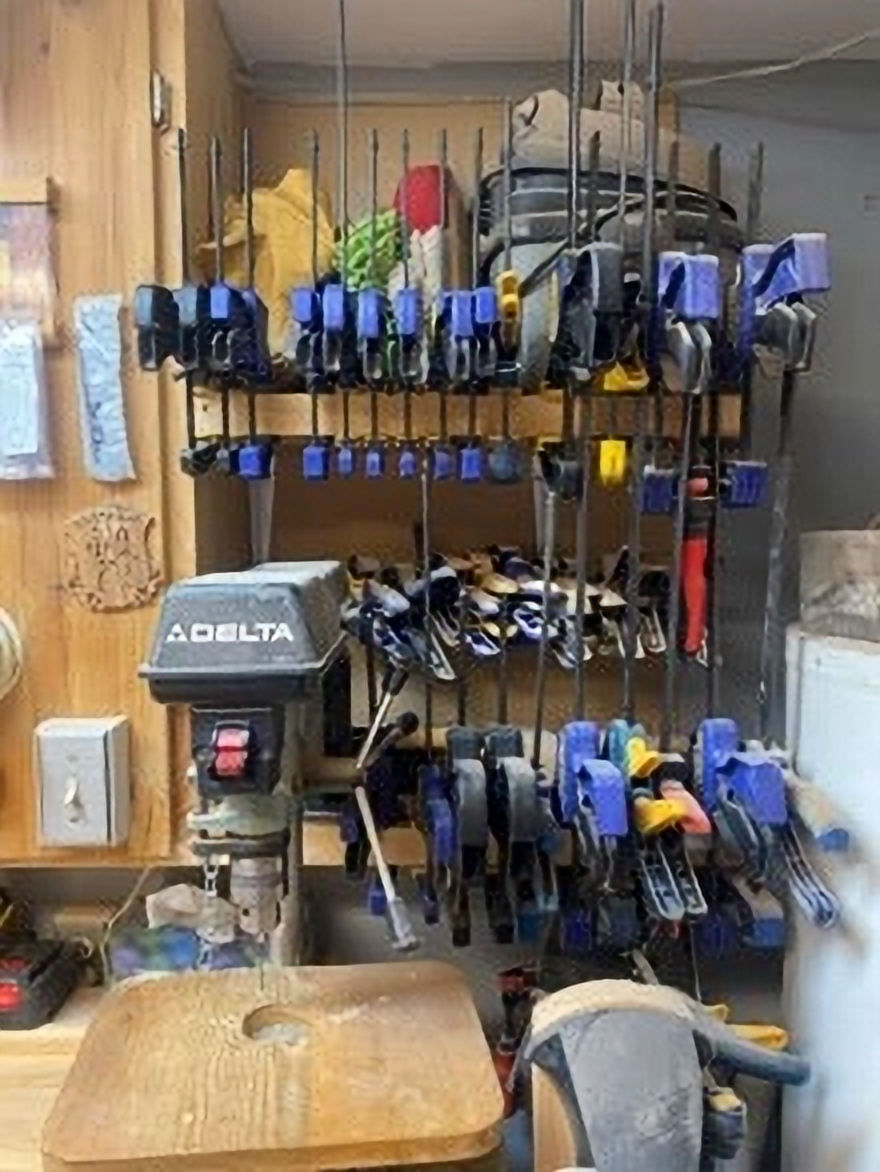
When it comes time to assemble your Intarsia project, you need lots of clamps—especially for the backer board. I have well over 100 clamps of various types and sizes, and I like to keep them close so they are easily accessible from the main workbench.
Quick-grip and spring clamps are my usual go-to clamps, but I also have several pipe clamps for larger pieces and corner clamps to assemble frames. Clamps are one of those things you build up over time, and I usually buy them when they are on sale—which is quite often.
Let There Be Music and Video
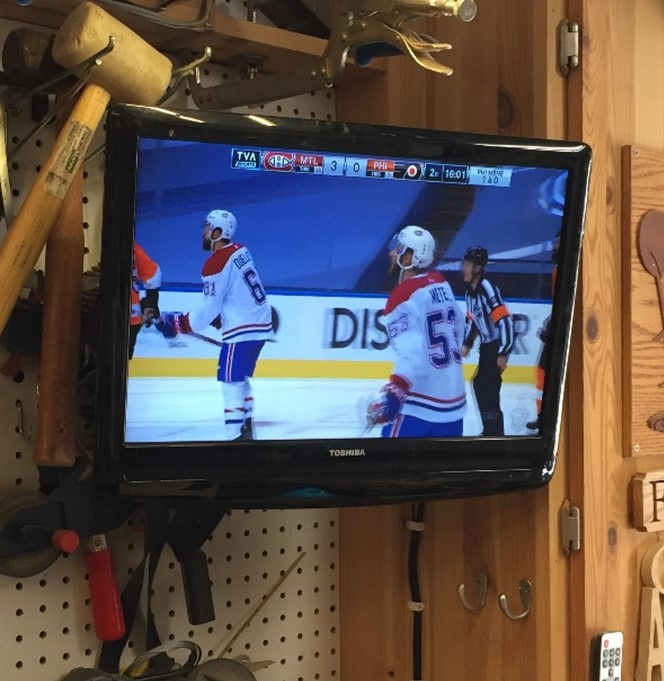
I have spent considerable time setting up the sound system for my workshop. While woodworking itself is a soothing rhythm, music adds the secret spice. It’s like seasoning your favorite dish—just the right amount can transform the ordinary into the extraordinary.
Picture this: I’m sanding away, and in the background, my speakers hum with classic rock or smooth jazz. Suddenly, the mundane becomes less monotonous. The sandpaper glides as if it’s part of a choreographed routine. Even the scroll saw seems to nod in approval. (Sorry, I’m getting carried away.)
Now, let’s talk tech. My sound system is a six-speaker wonderland, complete with a subwoofer that could wake the wood grain from its slumber. The star of the show? A Pyle receiver—powerful, affordable, and Bluetooth-enabled. Yes, you heard right—I can cast tunes from my phone.
But wait, there’s more! Mounted on the wall like a prized trophy is my 15-inch TV. It’s not just any TV; it’s my portal to the outside world. Hockey season? Oh, you bet! When the Canadiens score (Go Habs Go). Great for instructional videos, too! My laser engraver owes its existence to YouTube tutorials. Now, a word of caution: No headbanging near the power tools. Safety first, always.
The Laser

Let’s talk about the big changes since I got this machine in late 2023. I used to spend hours scrolling and working tirelessly from September to December, building a decent inventory to sell small Christmas ornaments for charity.
Now, the process has become much simpler: I download free designs from the web onto my laptop, load them into the machine, and press start. While the machine efficiently creates these small treasures, I have the freedom to immerse myself in my favorite pastime—Intarsia. This shift has not only saved me time and effort but also allowed me to focus more on the creative aspects of woodworking that I truly enjoy.
I have also found ways to incorporate engraving into Intarsia pieces. Look for more on this in an upcoming blog dedicated to the laser.
Final Word
In conclusion, setting up an effective Intarsia workshop involves careful planning and attention to detail, focusing on aspects like space, lighting, ventilation, work surfaces, tool organization, and safety. By tailoring these elements to your specific needs, you can create an environment that enhances your precision, comfort, and creativity. A well-designed workshop not only makes the intricate process of Intarsia more enjoyable but also ensures that your artistic vision can be realized with greater ease and efficiency. With the right setup, you’ll be well-prepared to craft beautiful, detailed wood pieces and fully engage in the art of Intarsia.
Until next time, happy woodworking!
Comentários